

How to Validate Trade Show Displays with Low-MOQ Orders

You know the anxiety of committing to a large order for trade show displays without proof of performance. Low-MOQ small-batch orders offer a proven way to test design, durability, and visual impact before scaling. Consider a marketing manager or a B2B distributor who needs a custom light box but hesitates to risk a substantial sum on an untested unit. A single unit order provides real data to evaluate. This post will guide you through step-by-step validation methods. Framing low-MOQ validation as smart business discipline, not a compromise, turns uncertainty into confidence for your next exhibition.
Key Takeaways
Test one display unit before you buy a full set.
Check the display under real booth lights to see color shifts.
Ask for 6063 aluminum and UL certification for safety.
Time how long setup and teardown take for your team to calculate labor ROI.
Fold and unfold the frame ten times to test durability and batch consistency.
Get feedback from your team and customers on visual impact.
Order a second small batch to test design changes and supplier reliability.
Use your test data to negotiate better prices and mold-fee refunds for larger orders.
Why Validating Trade Show Displays Matters
Avoiding Costly Inventory Mistakes
Financial risk of large orders
A large display order ties up significant capital before you have any proof the product works. The cost of a single SEG light box is modest, while a full set for multiple booths can be substantial. That money leaves your budget immediately. The displays might sit in storage for months before their first exhibition. If the frames arrive damaged or the graphics look wrong, you own the problem. Returns and reorders drain more budget. A small test order limits your exposure to one unit instead of a full fleet.
Storage and logistics burden
Large orders create physical problems too. Many collapsed light box frames take up serious warehouse space. You need shelving, climate control, and inventory tracking. Shipping a full order to a high-traffic trade show venue adds freight costs. Those costs multiply with every event. A single test unit fits in a corner. It ships in one case. You learn the real logistics cost before committing to a fleet.
Ensuring Brand and Design Alignment
Testing graphics in booth lighting
Your artwork looks different on a screen than under exhibition hall lights. A light box uses edge-lit LED panels. Those panels change how colors appear. A red logo might shift toward orange. A subtle gradient might vanish. Testing one unit in actual booth lighting reveals these problems. You can adjust your graphics files before printing a full run. This step protects your branding across every future event.
Confirming structural dimensions
Booth spaces vary. A display that fits one venue might block an aisle at another. A test unit lets you measure real footprint, height, and clearance. You confirm the frame fits your shipping cases. You check that the assembled structure matches your booth layout. These measurements guide your final order with confidence.
Building Stakeholder Confidence
Small-batch data for decision-makers
Executives approve budgets based on evidence. A single validated unit provides that evidence. You can show photos, setup times, and durability results. Decision-makers see real performance instead of vendor promises. This data shortens approval cycles for larger orders.
Early buy-in from sales teams
Sales teams use promotional displays at retail events and client meetings. Their feedback matters. When they see a working unit early, they suggest improvements. They also become advocates for the final order. Early involvement prevents resistance later.
Finding Low-MOQ Suppliers for Light Box Displays
Searching Specialized Display Manufacturers
Trade show forums and directories
Industry forums connect buyers with suppliers who welcome small orders. Trade show directories list vendors by product category. These resources often include reviews from other buyers. A supplier with positive feedback from small buyers deserves attention. Forums also reveal which vendors handle custom graphics well. This research saves time compared to cold outreach.
Keyword search for low MOQ
Search engines respond well to specific phrases. Terms like "low MOQ SEG light box" or "small batch exhibition light box" narrow results quickly. When searching for low-MOQ partners, look for source manufacturers that offer dedicated 'Small-Batch Rapid Customization' models. For example, Anew Display supports B2B buyers with single-unit prototyping and pilot runs, backed by a 20-year engineering team that provides structural evaluation and 3D drawing support before mass production. This ensures your test unit is not just a sample, but a fully validated blueprint for future scaling.
Vetting Supplier Quality and Capability
Requesting sample catalogs and engineering support
A catalog reveals more than product photos. Look for material specifications and certification details. Reputable suppliers list ISO 9001, CE, RoHS, or UL/ETL compliance. More importantly, a true source manufacturer like Anew Display doesn't just send a sample; they offer Engineering Support. They will review your structural concepts, suggest improvements for production feasibility (DFM - Design for Manufacturing), and provide technical drawings to ensure your custom design can be mass-produced cost-effectively.
Checking production lead times
Lead times vary by order type. Standard products ship in 3-7 days. Semi-custom orders take 8-14 days or more. Custom work can run 15-56 days. Low-MOQ buyers should confirm these timelines early. A supplier with reliable lead times supports better event planning.
Negotiating Small-Batch Terms
First-order size and repeat pricing
Start with the smallest possible order. One unit provides enough data for validation. Ask about pricing at higher volumes before committing. Suppliers often offer better rates for repeat customers. This information helps you budget for future orders.
Understanding tooling and setup fees
Custom graphics or extrusions may require setup fees. These charges cover print preparation, color matching, and tooling. Ask whether the fee applies to repeat orders. Forward-thinking manufacturers like Anew Display offer flexible pricing models where initial setup or mold fees can be refunded or deducted once your subsequent bulk orders reach a certain volume. This policy drastically lowers the trial-and-error costs for B2B buyers. Clarify all fees in writing before you pay.
Selecting the Right SEG Light Box Displays
How to Pick the Perfect SEG Light Box Display
Matching size and shape to booth space
Booth dimensions dictate the best configuration for SEG light box displays. A 10x10 space works well with a single high-impact backwall or an L-shaped layout. The L-shape improves traffic flow and serves as an industry benchmark. For a 10x20 booth, multiple light boxes bridged with specialized connectors create a continuous, massive visual surface. This approach scales easily.
Single-sided frames work best against booth walls. They maximize floor space ROI. Double-sided units suit island booths or high-traffic aisles. They capture attention from both directions without increasing footprint. To manage costs, use a large backlit center wall to anchor the space. Flank it with non-illuminated frames for supporting information.
Choosing between modular and freestanding
Modular light box systems offer flexibility for changing booth layouts. Freestanding units provide stability in high-traffic areas. For freestanding frames, deeper profiles of 100mm or more along with substantial feet keep the display upright and rigid. This choice depends on your specific exhibition needs and venue constraints.
Key Features to Verify Before Ordering
Aluminum alloy grade (e.g., 6063)
Insist on 6063-grade aluminum for structural rigidity and scratch resistance. This alloy outperforms softer alternatives, which matters for frames that are repeatedly packed, shipped, and reassembled. Request the extrusion's wall thickness in millimeters. Vague descriptions often indicate thinner, cheaper stock. Frame depths typically range from 60mm to 120mm. Deeper frames add freestanding stability and improve backlight uniformity. They also offer better accessory compatibility.
UL/ETL safety certification
UL/ETL certification is not optional for SEG light box displays. Exhibitors should ask vendors directly whether the LED modules carry UL or ETL listing, how the modules are constructed, and what warranty covers electrical failure.
US venues require UL or ETL listing at most major locations. European venues need CE marking. UK venues require UKCA marking. Australian venues need SAA certification. Keep a copy of the LED certification paperwork in your show kit for fire marshal inspections.
Designing for Easy Updates
SEG fabric tension vs. traditional frames
Silicone edge graphics allow quick insertion into the frame. This maintains a professional look and simplifies graphic swaps. Traditional frames require even stretching to avoid wrinkles. They offer moderate reusability and suit distance viewing. SEG fabric tension delivers vibrant colors and high resolution for close-up viewing.
Dye sublimation print quality check
Dye sublimation printing produces smooth, edge-to-edge displays. Check color accuracy and vibrancy before ordering. This print method works well for promotional materials and retail environments. Verify that your supplier stocks spare parts and ships in reusable cases.
Validating SEG Light Box Designs
Building and Testing a Single Unit
Your validation process begins when the package arrives. For SEG fabric light box systems, the supplier ships components disassembled in a reusable case. This packaging protects the frame during transit and reduces shipping volume. When the case arrives, inspect its condition. Damage to the case may indicate rough handling. Document any visible issues before opening.
Assembly and disassembly ease
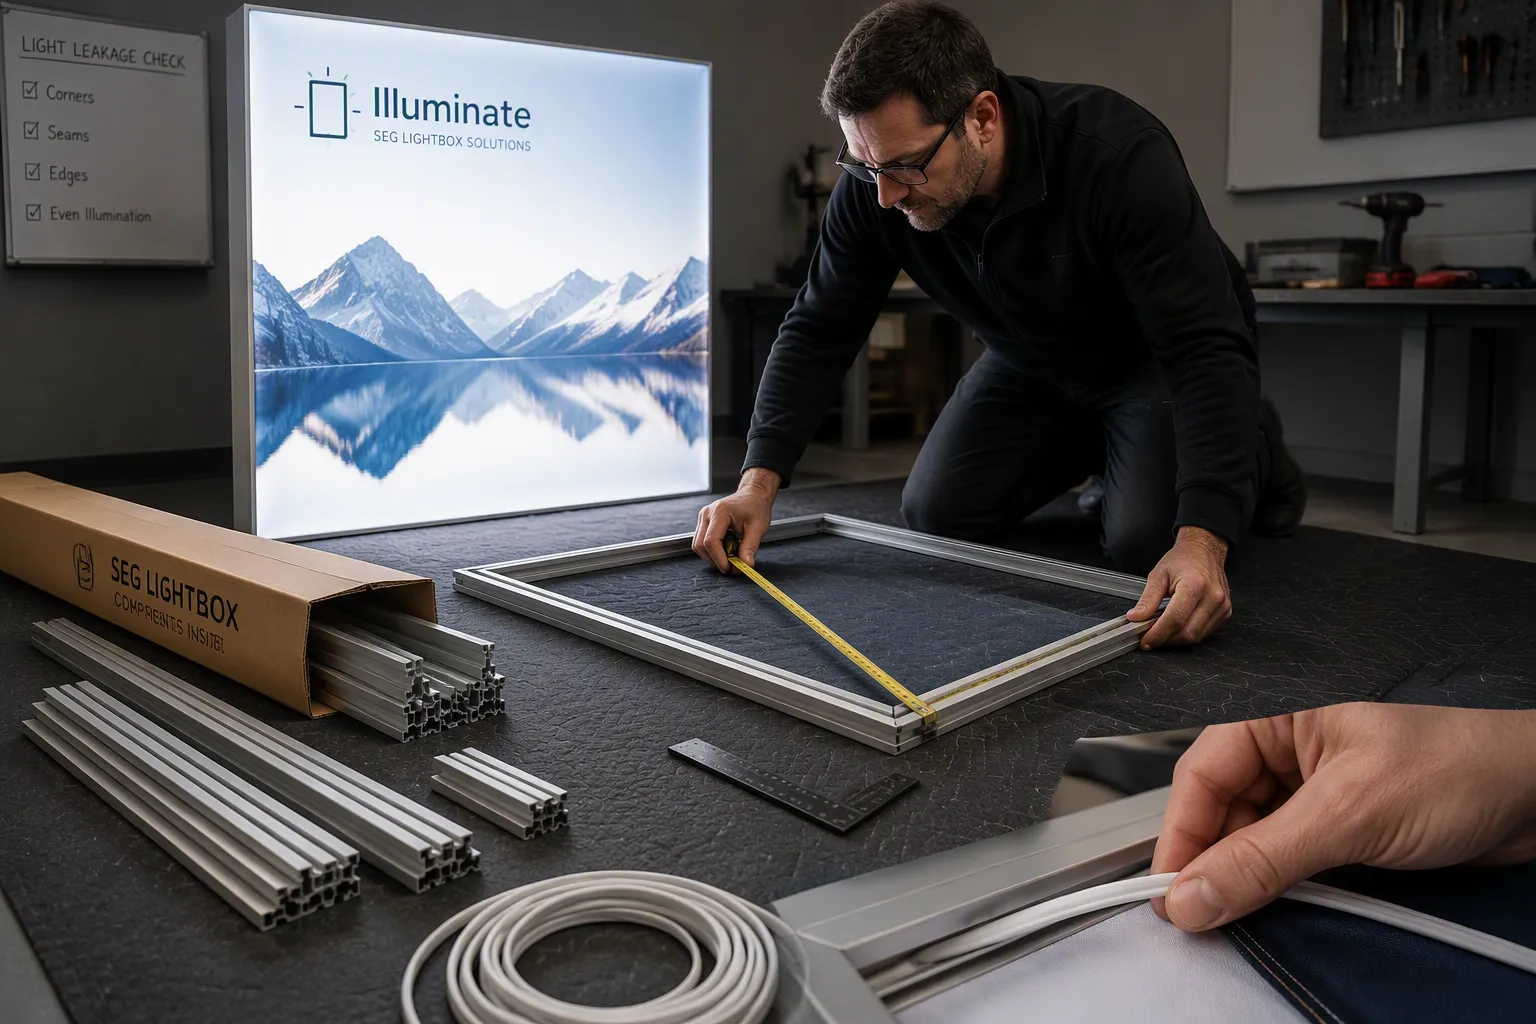
Start assembly on a flat surface. Check that all extrusion pieces align properly before connecting them. If the keder strip feels overly tight during installation, do not force it. First verify that the frame is square. A square frame ensures the SEG graphics fit smoothly into the channel. For larger displays, the frame may ship in two sections. This design simplifies transport but requires careful joining during setup. Time yourself during the first assembly. Record the process from unboxing to fully assembled unit. This data helps you estimate booth setup time at an exhibition.
For Digital Printing Companies: The most critical validation step is testing the compatibility between your printed silicone edge (keder) and the manufacturer's aluminum channel. A mismatch can cause the fabric to tear during installation or appear loose and wrinkled. Always order a sample frame to test your specific dye-sublimation fabric tension before committing to a full hardware fleet.
SEG light box displays require both sides of the frame to be closed. Light escaping from the back reduces the visual impact at your booth. Even for single-sided prints, the reverse side needs blank fabric installed. This step prevents light leakage and maintains consistent brightness. Test this during your first build. Turn the lights on in a dark room. Check for light escaping at corners and seams. Address any gaps before ordering additional units.
If the keder strip feels overly tight during installation, avoid forcing it. First verify that the frame is properly aligned and square, since a square frame is essential for the graphic to fit smoothly.
Lighting component functionality
Test every LED component during the validation phase. Connect the power supply and observe the light distribution across the fabric surface. Look for hot spots or dim areas. Consistent illumination across the entire light box confirms proper LED placement and reflector quality. Check the connection points between the power supply and the frame. Loose connections cause flickering. A flickering display at a trade show damages brand perception. Verify that the driver unit matches your local voltage requirements, which differ by region. Some suppliers offer universal drivers. Confirm this specification in your test unit documentation.
Assessing Print Quality and Fabric
Color accuracy and vibrancy
The printed surface defines your brand presentation. Evaluate color reproduction capability by requesting samples and comparing them under expected lighting at your exhibition venue. Dye sublimation printing on polyester fabric infuses ink directly into fibers. This method produces colors that resist fading under continuous LED illumination. The ink becomes part of the fabric rather than a coating on top. Assess ink saturation and depth during your visual inspection. Full ink saturation yields deep blacks and vivid colors. Washed-out results indicate insufficient ink application or poor fabric selection.
Place the printed sample in your actual light box frame. Turn on the lights. Observe the color under backlight conditions. The system's backlit excellence makes the visuals pop. Confirm that the fabric supports accurate color reproduction. A SEG light box display that looks vibrant in a showroom may appear dull under fluorescent exhibition hall lights. Test this directly. Hold a color reference swatch next to the illuminated fabric. Note any shifts in hue or saturation. This step helps you decide whether to adjust graphic files before placing larger orders. For optimal results, choose printing technologies such as dye sublimation, direct-to-fabric, or UV printing. These methods produce vibrant colors and high saturation.
Evaluate material color reproduction by requesting samples and comparing them under expected lighting.
Choose printing technology such as dye sublimation, direct-to-fabric, or UV printing for vibrant colors and high saturation.
Perform visual inspection of printed samples under backlight conditions to confirm vibrancy and detail.
Fabric stretch and durability
Trade show displays endure repeated packing, unfolding, and tensioning. Polyester-based materials maintain color vibrancy even under continuous illumination. This characteristic protects your design integrity across multiple events and reduces replacement costs. Knit fabrics offer flexibility and wrinkle resistance. They allow SEG graphics to be reinstalled repeatedly without damage. Woven fabrics hold shape firmly. They provide crisp surfaces that withstand tension and maintain brand consistency.
Polyester-based materials maintain color vibrancy even under continuous illumination, protecting design integrity and reducing replacement costs.
Knit fabrics offer flexibility and wrinkle resistance, allowing graphics to be reinstalled repeatedly without damage.
Woven fabrics hold shape firmly, providing crisp surfaces that withstand tension and maintain brand consistency across multiple events.
B1 fire rating (DIN 4102-1) is required for all fabric graphics in European venues, ensuring safety and compliance during repeated use.
Dye-sublimation printing on polyester infuses ink directly into fibers, producing colors that resist fading under continuous LED illumination. A typical SEG graphic lasts through dozens of shows if handled properly.
Check the fabric's fire rating before committing to larger orders. European venues require B1 fire rating per DIN 4102-1 for all fabric graphics. This certification ensures safety during repeated use. A typical SEG graphic on polyester fabric lasts through dozens of shows if handled properly. Test durability by installing and removing the fabric several times during validation. Note any fraying at the edges or stretching that affects fit. A fabric that maintains its shape after ten installations will perform reliably across your event calendar.
Ease of Setup and Graphics Change
Opening frame and swapping graphics
Quick and easy setup becomes critical when you manage multiple events in a single season. Test the graphic swap process during validation. Open the frame at the designated opening point. Slide the silicone edge out of the channel. Insert the new SEG graphics fabric. This process should take minutes, not hours. If the fabric requires excessive force, the keder channel may need adjustment. Alternatively, the fabric tension may be too high. Document the time required for each swap. This data helps you plan labor allocation for future events. The SEG fabric light box system's silicone edge design simplifies changes compared to traditional frames that require even stretching to avoid wrinkles.
Time required for full installation
Run a complete installation cycle during validation. Start with the disassembled components in the shipping case. Assemble the frame. Install the fabric. Connect the lighting. Place the unit in your booth layout. Record the total time. Repeat this process with the teardown cycle. Time the disassembly and packing as well. A display that takes significantly longer to take down than to set up creates scheduling problems at show closing times.
For Exhibition Booth Contractors: Time is money, and labor costs dictate profitability. During validation, time your crew's assembly process. A well-engineered modular system from a reliable factory can reduce a 2-person, 2-hour setup down to a 40-minute job. Validating this efficiency on a small batch proves the system's ROI before you deploy it across dozens of client booths.
Testing Light Box Displays for Durability
Wear and Tear Simulation
Repeated folding and unpacking
Trade show displays endure harsh handling across many events. A single unit may face dozens of setup and teardown cycles each year. Test this reality during validation. Fold and unfold the frame ten times in succession. Watch for loosening joints or bent connectors. The aluminum extrusions should return to their original shape after each cycle. Note any wobble that develops in the corners. A frame that stays tight after repeated handling will survive a full exhibition season.
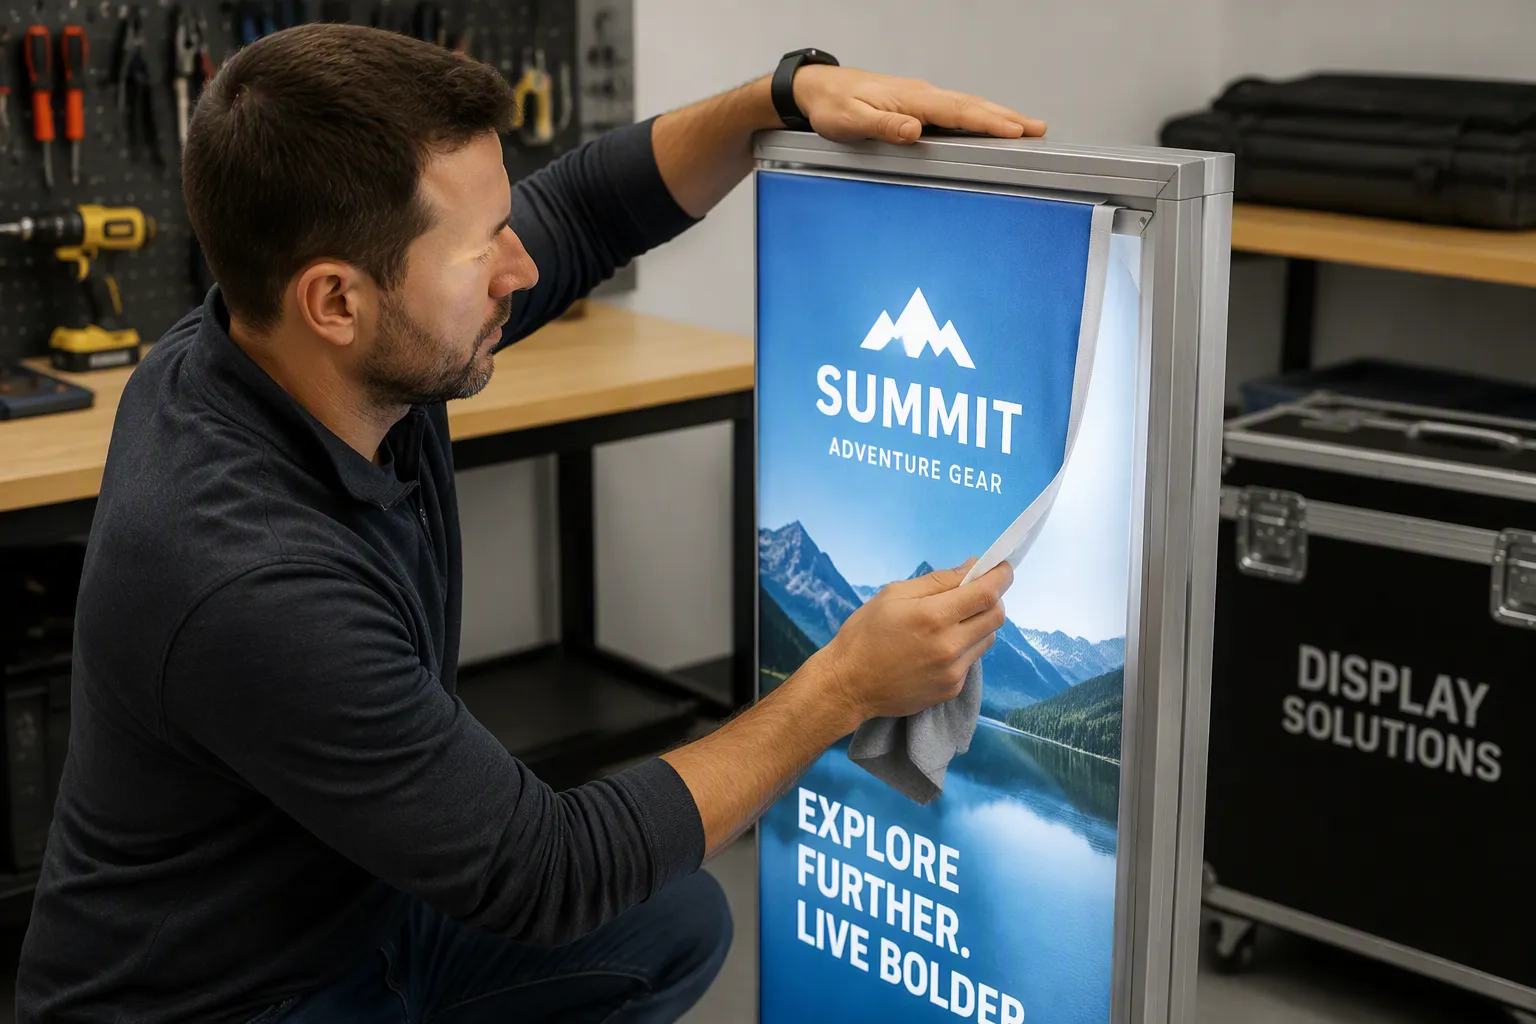
The fabric graphics also face stress from constant packing. Remove and reinstall the SEG graphics multiple times. Check the silicone edge for cracking or separation. The keder strip should slide smoothly into the channel without tearing. A quality SEG graphic maintains its shape after ten installations. Fraying edges or stretched corners signal a problem. Document these results before placing a larger order.
Surface scratch and smudge resistance
Booth visitors brush against displays. Shipping cases slide against frames. These actions leave marks on unprotected surfaces. Test the frame finish with a soft cloth and mild pressure. Anodized aluminum resists scratches better than painted surfaces. Check the fabric for smudge resistance. Dye sublimation printing infuses ink into the fibers. This process creates a surface that resists fingerprints and minor contact marks. Wipe the printed area with a dry cloth. The colors should remain vibrant without fading or transferring.
Structural Stability Checks
Frame weight load and balance
A light box display must stand firm during a busy show. Test the frame with gentle pressure from multiple angles. Push lightly against the top edge. The unit should resist tipping. An aluminum frame with a depth of 100mm or more provides a solid benchmark for structural quality. This depth adds rigidity without excessive weight. Check the balance point when the unit stands freestanding. Deeper profiles of 100mm or more improve stability. They also support better backlight uniformity. Place the tallest displays at the back of your booth layout. This positioning uses their height for visibility while keeping them away from foot traffic.
Vibration tolerance in booth fans
Exhibition halls use large ventilation systems. These fans create constant vibration. Place a running light box near a booth fan during testing. Observe the frame for rattling or shifting. Loose connections amplify vibration into visible movement. Tighten all fasteners before the test. A stable unit shows no wobble or noise. This check matters for modular configurations. Multiple smaller light boxes connected together must hold their alignment under vibration. Test the full assembly as one unit.
Transport and Storage Testing
Collapsed size vs. shipping case
Measure the collapsed frame dimensions after disassembly. Compare these measurements to your shipping case interior. The frame should fit with minimal empty space. Extra room allows components to shift during transit. That movement causes damage. A properly sized case protects the investment. Check that all pieces fit in one case when possible. This approach reduces freight costs and simplifies logistics. Record the packed weight for future shipping calculations.
Material weight and handling ease
One person should manage the setup without strain. Test lifting the collapsed frame and case. A single unit that requires two people creates scheduling problems. The 6063 aluminum alloy offers strength without excessive weight. This material choice supports easy handling. Verify that spare parts are available under low-MOQ conditions. Ask your supplier about replacement connectors, LED modules, and power supplies. A source for spare parts extends the display's service life. Test all lights before finalizing your order. A single failed LED module affects the entire visual impact. Confirm that the supplier stocks these components for quick shipment.
Gathering Feedback on SEG Light Box Displays
Collecting Internal Team Insights
Setup and teardown time feedback
Your team performs the actual work at every event. Their input during validation carries real weight. Ask each person who assembles the unit to record their time. Compare these numbers across multiple attempts. The time required for one person to build the display can differ from the time for two people if the process lacks clear steps. Note where confusion occurs. Maybe the frame connectors need labels. Perhaps the fabric orientation requires a marker. These small fixes improve efficiency before you order more units.
Teardown deserves equal attention. Show closing times create pressure. A unit that packs slowly delays your team and risks damage. Collect feedback on the packing sequence. Ask whether the shipping case holds everything securely. A display that stores cleanly protects your investment across many events.
Visual impact from booth entrance
Walk toward the assembled unit from the aisle. Observe how the light box reads from a distance. Does the illuminated surface draw your eye? Can you read the main message without squinting? Ask team members to stand at various distances and report their impressions. A display that looks impressive up close may fade into the background from across the hall. This feedback guides adjustments to brightness, graphic size, or placement within your booth layout.
Audience and Client Reactions
Mock booth with existing customers
Set up a small mock booth before a major show. Invite a few trusted customers to walk through the space. Watch their natural reactions. Do they pause at the illuminated display? Do they comment on the colors or the message? Their honest responses reveal whether your SEG graphics communicate clearly. Ask specific questions about what they noticed first and what they remembered afterward. This data proves more valuable than internal opinions alone.
Video recording for later review
Record the mock booth session from multiple angles. Capture the entrance view, the side approach, and close-up details. Review the footage with your team after the session. Video reveals patterns that live observation misses. You might notice visitors consistently stepping around a corner or leaning in to read small text. These observations inform your next design iteration.
Iterating Design via Small Batches
Sending revised artwork to supplier
Collect all feedback into a single revision list. Prioritize changes that affect clarity and brand recognition. Send updated graphics files to your supplier with clear instructions. Ask for a digital proof before printing. This step catches errors early and saves material costs. A second test batch with revised artwork confirms whether your changes solved the original problems.
Reordering a second test batch
Order another small batch with the updated design. Test the new version under the same conditions as the first. Compare results side by side. This cycle of feedback and revision builds confidence before you commit to a full production run. Each small batch teaches you something new about the display's performance in real exhibition conditions.
Scaling Up Your Display Validation
Confirming Supplier Consistency
Quality across multiple small batches
Your test orders reveal the supplier's true consistency. Compare the aluminum alloy specification across each batch. The 6063 grade should match every shipment. Check the wall thickness in millimeters each time. A supplier who delivers the same specification earns your trust.
For Exhibition Equipment Wholesalers: Small-batch validation is primarily about testing batch quality consistency. It is easy for a factory to produce one perfect sample. The real test is whether the aluminum wall thickness, LED chip quality, and stitching precision remain identical across your second and third orders. Use your initial test batch to establish a strict QC checklist that the supplier must adhere to for all future wholesale shipments.
Communication and lead time reliability
Monitor response times during test orders. Some suppliers respond quickly, while others take longer. A consistent pattern indicates organized operations. Check on-time delivery rates. These range from 90.0% to 99.3% across suppliers. Order lead times vary by order type. Standard products ship in 3-7 days. Semi-custom orders take 8-14 days or more. Custom work can take 15-56 days. Confirm these timelines match your event schedule.
Placing a Larger Production Order
Negotiating volume discounts with data
Your test order data provides real leverage. Higher volumes lead to lower per-unit costs through economies of scale. The table below lists key factors that influence pricing.
Negotiation Data Point | Details |
|---|---|
Order Volume | Higher volumes typically produce lower per-unit costs. |
Standard MOQ | Standard designs start at 50-100 units. Custom configurations may need 200+ units. Some suppliers accept around 20 units at a premium. |
Certifications | Required international certifications may raise the base cost. |
On-Time Delivery Rate | Ranges from 90.0% to 99.3% across suppliers. |
Payment Terms | Example terms include a 30% deposit with balance upon completion. |
Bulk order discounts remain open to discussion. Present your validation data during negotiation.
Setting quality control checkpoints
Define inspection points before production begins. Check the first light box against your approved sample. Confirm the aluminum alloy matches the test units. Verify LED certification documentation. Inspect the first print under actual backlighting. Compare the color to your approved sample. Clarify all terms before placing the larger order.
Creating a Repeat Order Pipeline
Scheduling periodic small-batch refreshes
The frame and lighting are designed for repeat use. Keep the aluminum frame in place and swap only the fabric graphic. Schedule refreshes around your event calendar. Order SEG graphics before each major exhibition. The SEG graphics arrive ready to install. Plan replacement before colors begin to fade.
Pro Tip: The aluminum frame and LED lighting are designed for years of repeat use. You only need to order compatible SEG graphics for new events, products, and campaigns, drastically reducing your long-term hardware costs and improving ROI.
Planning seasonal display updates
Use light box displays for events where visuals change between campaigns. The promotional impact of a new visual draws attention. The fabric graphics make the system practical. You can update for different campaigns without replacing the full display. Order new graphics before each season. Store the previous set for backup.
Your validation cycle now supports a complete display management system. Each small batch taught you something useful. That knowledge guides every future order.
Validating trade show displays through low-MOQ small-batch orders minimizes risk and confirms quality before you scale. This approach is not about settling for less. It is about making smarter decisions with your budget. You gain real data on design, durability, and visual impact. That proof protects your brand and your investment. Start with one SEG light box, test it in your booth, and let that proof guide your next investment. Your budget and your brand will thank you.
FAQ
What is a low-MOQ order for a trade show display?
A low-MOQ order means you buy the smallest quantity a supplier will accept. Several manufacturers list a minimum of one set or one piece for modular SEG light boxes. This lets you test a single unit before committing to a full booth fleet.
How much does a single SEG light box test unit cost?
Pricing depends on size, frame depth, and print complexity. Request a written quote that separates the frame, the graphic, and any setup fees.
Which certifications should a light box carry before I order?
US venues generally require UL or ETL listing for the LED modules. European venues need CE marking, and UK venues require UKCA. Australian venues ask for SAA certification. Fabric graphics in European venues need B1 fire rating under DIN 4102-1.
What aluminum alloy should I specify for the frame?
Ask for 6063-grade aluminum. This alloy offers better structural rigidity and scratch resistance than softer alternatives. Request the extrusion wall thickness in millimeters and the frame depth, which usually ranges from 60mm to 120mm. Deeper profiles improve freestanding stability.
How long does a small-batch order take to ship?
Lead times vary by order type. Standard products ship in 3-7 days. Semi-custom orders take 8-14 days or more. Custom work can run 15-56 days. Confirm the timeline against your event calendar before you pay.
Can I replace only the graphics instead of the whole display?
Yes. The frame and lighting are built for repeat use, and compatible SEG graphics can be swapped for new events, products, or campaigns. Keep the aluminum frame in place and order fresh fabric before each major exhibition.
How many setup cycles should a test unit survive?
A quality SEG graphic typically lasts through dozens of shows when handled properly. During validation, install and remove the fabric about ten times. The frame should stay tight and the keder strip should slide smoothly without tearing or fraying.
When should I move from a test batch to a full production order?
Scale up after your test unit passes assembly, lighting, print, and durability checks. Standard designs usually start at 50-100 units, while custom configurations may need 200 or more. Present your validation data during pricing talks to negotiate better terms.
Ready to Validate Your Next Display Project?
Stop guessing and start testing. Contact Anew Display's dedicated B2B service team today to get a quote for your low-MOQ custom light box prototype. Our engineering team is ready to review your designs and provide a free structural feasibility assessment.
Please Contact Us!
Recent News
1.What are the basic elements of the pavilion design that need attention?
2025-10-142.What are the main points of booth design and construction in exhibition design?
2025-10-143.Why do enterprises have to be exhibition halls when they develop to a certain scale?
2025-10-144.How to better display the cultural charm of enterprises and brands in the exhibition hall design?
2025-10-145.How to highlight the focus of the exhibition?
2025-10-14